
Create a Template
Before you create an automated alert, you'll need to create a template that will be published when an NWS event occurs.
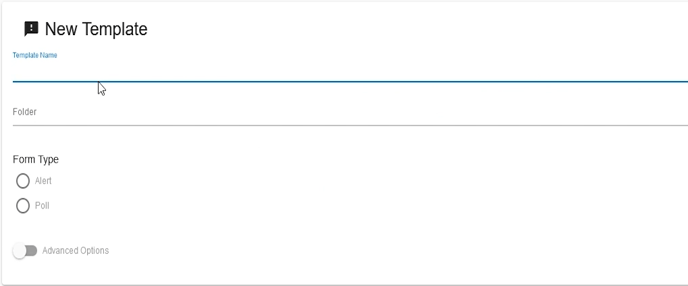
- Select Alerting/Poll Templates from the drawer menu.
- Name your template in the Template Name field.
- Type the name of the folder where your template will be stored in the Folder field.
- Select your template type, either alert or poll.
- If you want to customize the template, click the Advanced Options toggle.
- If you toggle Advanced Options to On, the Build Template card will appear.
- To remove a field from the template, click the Delete
 button next to the field's name.
 - To add a field to the template, click Add New Field and select the field that the template should contain from the dropdown menu.
- For example, selecting Social Media from the dropdown menu ensures that an alert will be posted to social media.
.png?width=688&name=2021-10-29%20(2).png)
- For example, selecting Social Media from the dropdown menu ensures that an alert will be posted to social media.
- To remove a field from the template, click the Delete
- Complete remaining template fields.
- Click Save to save your template.
Please note, the Recipients, Subject, and Body fields are required. Text entered in the Subject and Body fields will be replaced by text from the NWS event that triggered the alert.
Create an Integration
- Select Integration from the drawer menu.
- To create a new integration, click the blue plus button
.png?width=24&name=2021-10-21%20(1).png) .
. - Name the integration.
- Specify criteria that will determine when an alert is published.
- From the Trigger field's dropdown menu, select the NWS action that will trigger the automated alert. For example, to create an automated alert when the National Weather Service publishes a new alert, select NWS Weather Alert (New). The three options for weather alerts are NWS Weather Alert (Cancel, NWS Weather Alert (New), and NWS Weather Alert (Update).
- From the Phenomena dropdown menu, select the NWS event(s) that will trigger an automated alert. For example, select Tornado if you want to send automated alerts about relevant NWS Tornado alerts.
- The Location field represents areas that could be included in NWS events. By selecting an area from this menu, you will designate which areas an NWS event should include for the event to trigger an alert.
- Select the NWS event severity level(s) that should trigger the alert from the Severity dropdown menu.
- From the Action field's dropdown menu, select "Send Weather Alert Template" to ensure that an alert based on a specific template is published.
- Complete the Alert Sender field. The field will default to the user creating the integration.
- Select the alert template that will automatically send when a trigger occurs.
- Select Save. You will return to the Integrations card, where you can view your new integration.
.png?width=688&name=2021-10-29%20(4).png)
Editing an Integration
- After an integration has been created, you can delete the integration by clicking the Delete button next to the integration's name.
- To edit an integration, click on the integration's name within the list view. Make your changes, then click Save.
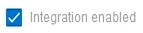
- To disable an integration, deselect the Integration Enabled checkbox
 .
.
- If you disable an integration, the integration's status will switch to Not Active. You will see this change from the Integrations list view.
- To disable an integration, deselect the Integration Enabled checkbox
Testing the Automated Alert
Before an NWS event triggers an automated alert, you can test an integration by manually triggering an example alert.
Warning: Testing an action will send a real alert that is populated with a sample NWS event template that Konexus will provide. We strongly recommend that you customize the message text to include the word "Test."
- From the Edit Integration card, click Test Action
.png?width=49&name=2021-10-29%20(11).png) . Clicking Test Action will launch the Test Action dialog.
. Clicking Test Action will launch the Test Action dialog. - Select a test event from the Test Events dropdown menu. The Test Event Data text box will then populate with information from a template.
- Check the checkbox next to the text "I understand that triggering this integration will perform the configured action" to confirm that you understand that testing the action will send a real alert.
- Click Trigger Now
.png?width=68&name=2021-10-29%20(10).png) to send the test alert. After you click Trigger Now, the Test Action dialog will close, and a text box will appear at the bottom of the screen to confirm that your message has been sent.
to send the test alert. After you click Trigger Now, the Test Action dialog will close, and a text box will appear at the bottom of the screen to confirm that your message has been sent..png?width=688&name=2021-10-29%20(6).png)
- Navigate to the History/Reports tab or the Sent tab to view the sent alert.
.png?width=688&name=2021-10-29%20(7).png)