
About RSA Archer – Konexus Integration
The RSA Archer - Konexus integration for iPhone and Android synchronizes with the RSA Archer Business Continuity BC/DR plans, enabling users to view business continuity or disaster recovery plans and associated strategies, tasks, call trees, and requirements from their Apple iOS and Android devices. The mobile application supplements hard copy plans when a user may not have access to their RSA Archer instance during a crisis. If the data center goes down during a disaster or crisis, the end-user will still have access to plans, ready to act.
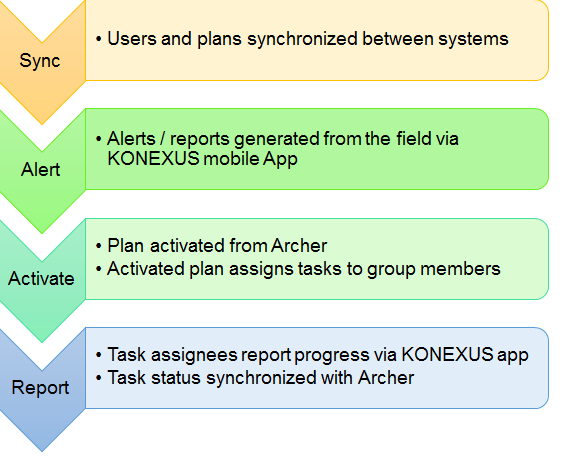
The integration streamlines crisis response and transforms RSA Archer business continuity and crisis management plans into actionable, role-based, task lists that put critical information in the hands of users via their mobile devices.
Task lists can be created in Konexus based on an Activated Plan in Archer. This delivers instantly to the designated teams for completion on a mobile app, giving better visibility into the progress of task lists. Recovery Coordinators can monitor the completion of task lists and recovery status from the mobile app or Archer. Crisis Incidents created in Archer are published to mobile users for selection in Crisis/Incident Reporting.
The use cases addressed in the integration:
- Send Alert from Konexus Mobile → Crisis Manager
- Crisis Manager Activates a crisis in Archer
- Connector Service creates a crisis in the Konexus system
- Connector Service sends Archer Task to Konexus system
- Connector Service receives task updates from the Konexus system and updates the Archer tasks
- Connector Service copies BCDR Plan from Archer to Konexus
Architecture

Key Features and Benefits
Key benefits
With the RSA Archer - Konexus Integration, you can:
- Provide mobile access to the plans and critical content (even if RSA Archer or the network is unavailable).
- Deliver actionable task lists to mobile teams, with real-time monitoring of completion/recovery status.
- Simplify crisis or incident reporting from the scene, with situational intelligence delivered through automated escalation paths based on event type and role.
- Enhance collaboration with global, multilingual teams with an in-stream translation of secure chat conversations, alerts, polls, and tasks.
- Enable monitoring of risks, assessments and responses to reported events.
- Alert site users and mobile travelers in selected areas to quickly account for safety and status.
- Accelerate your response to crisis events by providing responders immediate access to recovery plans.
- Reduce negative impacts on revenue, brand image, and stakeholder confidence because of accelerated response.
Service Requirements
|
Components |
Recommended Software |
|
Operating System |
Windows Server 2012 R2 and above |
|
Web Server |
Microsoft Internet Information Services (Included in Windows Server 2012 R2 or 2016) |
|
Framework |
Microsoft .Net framework 4.5.2 and above |
|
Deployment Requirements |
Connector service can be deployed on the same server or on a different server that is hosting the RSA Archer Platform.
It is recommended to deploy the Connector service on a different server with the above recommended software. |
|
Network Requirements |
The Konexus Connector Service and REST Endpoint component should have network access to RSA Archer. |
|
App Device Requirements |
Android/iOS |
|
Supported Platform Version |
This offering has been developed for and validated on RSA Archer Platform release 6.5. |
|
Pre-requisite RSA Archer use cases |
|
Upgrading to the New Version of the Connector
The new version of the connector comes with an improved logging system for increased flexibility, as well as a reimagined configuration format that makes it easier to configure.
Logging
This release of the connector includes a new logging framework called Serilog. This logging framework provides flexibility in the type and format of your logs. For most scenarios, the following figure provides a typical configuration. This example will log messages from the Debug level and up to a file located at C:\ArcherFiles\SyncService.log.
<appSettings>

    ... SNIP ...

    <add key="serilog:minimum-level" value="Debug" />
    <add key="serilog:using:File" value="Serilog.Sinks.File" />
    <add key="serilog:write-to:File.path" value="C:\ArcherFiles\SyncService.log" />

</appSettings
App.config - Serilog Settings
Configuration
The new configuration format that comes with this release of the connector groups relevant settings into discrete XML nodes rather than a single node with many attributes. The figure below provides a sample listing of this new format.
<connectorSettings>
The <connectorSettings> node is what houses the new configuration format. All subsequent nodes will exist below this node.
<configSections>
  <section name="connectorSettings"
type="ArcherTech.Services.SyncService.Konexus.Configuration.ConnectorSettingsConfigSection, ArcherTech.Services.SyncService" />
</configSections>

<connectorSettings>
    <instances>
      <instance name="my-instance-name"
                cacheFile="C:\ArcherFiles\ArcherCacheFile.txt"
                cacheFilePassphrase="my-cache-passphrase"
                templateFolder="C:\ArcherFiles\Templates">
        <archer baseUrl="https://archer"
                instance="Default"
                username="my-username"
                password="my-password"
                useSslValidation="true" />
        <konexus authUrl="https://auth.alertsense.com"
                 contentUrl="https://content.alertsense.com"
                 apiUrl="https://api.alertsense.com/public"
                 clientId="rsa"
                 clientSecret="my-client-secret"
                 apiKey="my-api-key" />
        <planReport name="Plan Report"
                    id="my-plan-report-id"
                    maxRecords="100"
                    interval="00:01:00"
                    templateFileName="PlanTemplate.json" />
        <crisisReports>
           <report
             name=""
             id=""
             maxRecords=""
             interval="" />
             templateFileName="PlanTemplate.json" />
        </crisisReports>
        <reports>
          <report name="Recovery Task Report"
                  id="my-recovery-task-report-id"
                  maxRecords="100"
                  interval="00:01:00"
                  templateFileName="RecoveryTaskTemplate.json"
                  folder="Incident Guide" />
        </reports>
      </instance>
    </instances>
</connectorSettings>
App config.- connectorSettings
<instances>
The <instances> node will house one (1) or more connector instances. Under most circumstances, a single connector instance will be used.
 <connectorSettings>
   <instances>
     <instance name="my-instance-name"
               cacheFile="C:\ArcherFiles\ArcherCacheFile.txt"
               cacheFilePassphrase="my-cache-passphrase"
               templateFolder="C:\ArcherFiles\Templates">
       </instance>
   </instances>
 </connectorSettings>
App config. - instance
|
Property |
Description |
Required |
Values/Examples |
|
name |
A friendly name for the instance. This value will appear in the log file. |
Yes |
My Company Archer |
|
cacheFile |
A file path at which to create the cache file. This includes the filename and extension. |
Yes |
C:\ArcherFiles\ArcherCacheFile.txt |
|
cacheFilePassphrase |
The passphrase to use when encrypting the cache file. |
Yes |
my-cache-passphrase |
|
templateFolder |
The path to the folder where report templates reside. This should not include a filename or extension. |
Yes |
C:\ArcherFiles\Templates |
<archer>
The <archer> node will house credential and configuration values for the instance it refers to. See the example and table below for more information.
<connectorSettings>
  <instances>
    <instance>
      <archer baseUrl="https://archer"
              instance="Default"
              username="my-username"
              password="my-password"
              useSslValidation="true" />
    </instance>
  </instances>
</connectorSettings>
App config. - archer
|
Property |
Description |
Required |
Values/Examples |
|
baseUrl |
The URL at which to login to Archer. |
Yes |
https://archer.mycompany.com |
|
instance |
The Archer instance name. |
Yes |
Default |
|
username |
The Archer username to login as. |
Yes |
john.smith@mycompany.com |
|
password |
The Archer password to login using. |
Yes |
trustno1! |
|
useSslValidation |
Whether or not the Archer instance uses SSL. |
Yes |
Valid values are either true or false |
<konexus>
The <konexus> node will house credential and configuration values for your company’s Konexus region. See the example and table below for more information.
<connectorSettings>

  <instances>

    <instance>

      <konexus authUrl="https://auth.alertsense.com"

               contentUrl="https://content.alertsense.com"

               apiUrl=”https://api.alertsense.com/public”

               clientId="rsa"

               clientSecret="my-client-secret"

               apiKey="my-api-key" />

    </instance>

  </instances>

</connectorSettings>
App. config - konexus
|
Property |
Description |
Required |
Values/Examples |
|
authUrl |
The URL at which to login to Konexus. |
Yes |
https://auth.alertsense.com |
|
contentUrl |
The URL at which Konexus stores content. |
Yes |
https://content.alertsense.com |
|
apiUrl |
The URL at which Konexus stores incidents and task lists |
Yes |
http://api.alertsense.com/public |
|
clientId |
The connector’s Id. |
Yes |
This will always be rsa |
|
clientSecret |
The secret provided to you by Konexus. |
Yes |
|
|
apiKey |
The API key provided to you by Konexus.. |
Yes |
<planReport>
The <planReport> node will house the configuration values for the plan report. See the example and table below for more information.
<connectorSettings>

  <instances>

    <instance>

      <planReport name="Plan Report"

                  id="my-plan-report-id"

                  maxRecords="100"

                  interval="00:01:00"

                  templateFileName="PlanTemplate.json" />

    </instance>

  </instances>

</connectorSettings>
App. config- planReport
|
Property |
Description |
Required |
Values/Examples |
|
name |
A friendly name for the plan report. This name will appear in the log file. |
Yes |
Plan Report |
|
id |
The Id of the report in Archer. |
Yes |
1b35998f-963a-4f3c-a695-5779143344a6 |
|
maxRecords |
Limits the total number of plans to be synchronized to the mobile app. A smaller number is helpful while designing your mobile layout because sync will run faster. |
Yes |
100 |
|
interval |
The delay time between synchronization iterations. This is expressed in HH:MM:SS format. |
Yes |
00:01:00 |
|
templateFileName |
The filename of the template to use for this report. If omitted, the connector will look for a JSON file with a name that matches the id field. |
No |
PlanTemplate.json |
<reports>
The <reports> node will house the configuration values for the recovery task report. See the example and table below for more information.
<connectorSettings>

  <instances>

    <instance>

      <reports>

        <report name="Recovery Task Report"

                id="my-recovery-task-report-id"

                maxRecords="100"

                interval="00:01:00"

                templateFileName="RecoveryTaskTemplate.json"

                folder="Incident Guide" />

      </reports>

    </instance>

  </instances>

</connectorSettings>
App. config - reports/report
|
Property |
Description |
Required |
Values/Examples |
|
name |
A friendly name for the report. This name will appear in the log file. |
Yes |
Recovery Task Report |
|
id |
The Id of the report in Archer. |
Yes |
1b35998f-963a-4f3c-a695-5779143344a6 |
|
maxRecords |
Limits the total number of records to be synchronized to the mobile app. A smaller number is helpful while designing your mobile layout because sync will run faster. |
Yes |
100 |
|
interval |
The delay time between synchronization iterations. This is expressed in HH:MM:SS format. |
Yes |
00:01:00 |
|
templateFileName |
The filename of the template to use for this report. If omitted, the connector will look for a JSON file with a name that matches the id field. |
No |
RecoveryTaskTemplate.json |
|
folder |
The folder in which this content should appear in the mobile app. |
Incident Guide |
Migrating from an Older Connector Version
Many of the settings have been relocated to provide better grouping and context. However, some settings have been removed and others added. To begin migrating from previous versions of the connector to this new version, refer to the table below to see how settings must be mapped from the old configuration to the new configuration. Settings that no longer apply are marked with N/A.
|
Old Attribute |
New Node |
New Attribute |
|
archerBaseUrl |
archer |
baseUrl |
|
cacheFileNameAndPath |
instance |
cacheFile |
|
cacheFileEncryptionPassphrase |
instance |
cacheFilePassphrase |
|
useSslValidation |
archer |
useSslValidation |
|
archerInstance |
archer |
instance |
|
archerUser |
archer |
username |
|
archerPassword |
archer |
password |
|
filteredUserCsvFilename |
N/A |
N/A |
|
logFileNameAndPath |
N/A |
N/A |
|
alertSensePreAlphaApiUrl |
konexus |
contentUrl |
|
AlertSenseAccessID |
konexus |
clientId |
|
AlertSenseAccessSecret |
konexus |
clientSecret |
|
alertSenseApiKey |
konexus |
apiKey |
|
AlertSenseBaseApiUrl |
konexus |
authUrl |
|
alertSenseApiUrl |
N/A |
N/A |
|
sftphost |
N/A |
N/A |
|
sftpdestination |
N/A |
N/A |
|
sftpusername |
N/A |
N/A |
|
sftppassword |
N/A |
N/A |
|
sftpport |
N/A |
N/A |
BC/DR Plans
Create BC/DR Plans in the mobile app
There is a new report created “Archer - Konexus Integration BC/DR Plans Source Report” for the integration, which acts as a source to create a BC/DR plan in Konexus. This allows a user to add/remove a field or change the structure of the plan in Konexus app content. This is the report that needs to be changed.
Mobile App Content Layout
The mobile app content layout is composed of two component types: node and element. Fields from the plan source report are then mapped to nodes and elements to construct the mobile apps content layout.
- Node: a node represents a single pageview. Nodes are built from a list of Elements
- Element: an element represents a block of content with a title and content section

Example of display nodes and elements.
Defining the Layout
Create mobile app templates for the Archer reports:
After adjusting the report configuration in the App.config file, report templates need to be created for each report in the configuration. The report template file dictates how content will be displayed in the Konexus mobile app; defining both the mobile view hierarchy and which fields are imported from the plans.
Creating a report template is a three step process:
- Retrieve the report id from Archer
- Export a sample report.
- Build the report template .json
Step 1. Retrieve the Archer Report Id
The Archer report Id can be found in the Save Report Changes dialog when a report is saved under the Alias: label. The ID consists of the text in between the curly braces. For example, in figure 1.0, the id is “38EAA257-5237-4E14-8371-092B0C8E1F7F”

Archer Report Id
Step 2. Export a sample report
There are two options for exporting the reports. The ArcherReportExportPath setting can be enabled in the connector configuration or the Export-Report.ps1
- Using the ArcherReportExportPath setting in the connector
- Enabling the ArcherReportExportPath setting will export all reports configured in the connector each time the reports are pulled. Only the last report is saved.
- To enable the ArcherReportExportPath setting, add the following setting to the <appSettings> section in the connector’s configuration file. The value needs to be pointing to an existing directory that the reports will be written to.
- <add key="ArcherReportExportPath" value="\reports"/>
- Using the Export-Report.ps1
- The Export-Report.ps1 script will export a report from Archer into XML format.
- The exported XML will be used to identify field Ids used in the mobile app content layout. Run the report using Windows PowerShell. By default the exported report will be saved into the current directory.
- The script accepts the following arguments:
|
argument |
Description |
Required |
Default Value |
|
report_guid |
The report ID of the report to be exported |
Yes |
|
|
archer_url |
URL of the Archer server to export the report from |
No |
https://Archer |
|
username |
Archer username |
Yes |
|
|
instance |
Archer Instance |
No |
Default |
|
password |
Archer Password |
Yes |
|
|
user_domain |
Archer Domain |
No |
|
|
output |
File to export the report to. |
No |
${report_guid}.xml |
.\Export-Report.ps1 "38EAA257-5237-4E14-8371-092B0C8E1F7F" -archer_url "https://Archer" -username "my-username"
Step 3. Build the report template .json
Create a report template file in template folder using the name you configured in the <reports><report templateName=”your-report-template.json”>
A report template contains the following sections:
- acl - The access control list determine who can view the content on the mobile app.
- updateTriggerField - Defines the field that trigger the content to be updated on the mobile app.
- activationFields (plan report only) - Defines the fields used to determine if a plan has been activated.
- root - Defines the layout of the content in the mobile app.
Access Control List (ACL) Section
This is the first section of the report template and determines who can view the content created by the report. Any field that contains User Groups can be used to determine access control, but must be listed in the fields of the report template (see the example below).
{
 "acl": [
   {
     "type": "user",
     "permission": "view",
     "fields": [
       {
         "fieldDefinitionName": "Recovery Team",
         "fieldDefinitionGuid": "aff83db4-959a-48cd-9636-fa893f2f9c8c"
       },
       {
         "fieldDefinitionName": "Plan Owner",
         "fieldDefinitionGuid": "0b563569-a4cd-41af-83e8-f2caa7767283"
       }
     ]
   }
 ],
 "updateTriggerField": {
 },
 "root": {
 }
Report Template - ACL Example
|
Property |
Description |
Required |
Values/Examples |
|
type |
The type of resource to secure. |
Yes |
user is the only type supported |
|
permission |
The permission to be granted by this acl. |
Yes |
view is the only permission available. |
|
ids |
A list of resource ids or wildcard patterns to apply the acl to. |
No |
[214,124, 555] - Ids of the resources being secure. For example, if type = “user” then this would be a list of RSA User Account Ids.
[report:*] - acl will be applied to all RSA User accounts found in the report. NOTE: Values are case sensitive |
|
fields |
A list of report fields to extract resource ids from. |
No |
[ { "fieldDefinitionName": "Recovery Team", "fieldDefinitionGuid": "aff83db4-959a-48cd-9636-fa893f2f9c8c" }, { "fieldDefinitionName": "Plan Owner", "fieldDefinitionGuid": "0b563569-a4cd-41af-83e8-f2caa7767283" } ] |
updateTriggerFields Section
Defines the fields that trigger the content to be updated on the mobile app. The value of this field is tracked and any change to the field’s value will trigger a report item to be updated.
{
 "acl": [
 ],
 "updateTriggerFields": [{
    "fieldDefinitionName": "Approval Date",
    "fieldDefinitionGuid": "c2dc4cfb-f621-4bab-b294-b9846e1c5bf7"
 }],
 "root": {
 }
}
Figure 1.1: Report Templates - ACL Example
|
Property |
Description |
Required |
Values/Examples |
|
updateTriggerFields |
The report fields used to trigger updates. |
Yes |
[{ "fieldDefinitionName": "Approval Date", "fieldDefinitionGuid": "c2dc4cfb-f621-4bab-b294-b9846e1c5bf7" }] |
Activation Fields
Defines the fields used to determine if a plan has been activated. One or more fields can be listed. The first field that evaluates to "true" will move the plan to the "Activated" folder in the app. A field can be a value list type with "yes" or "no" values or a string field with "yes" or "true". Activation fields are optional and if not provided all plans will be in the "Not Activated" folder in the app.
  "activationFields": [
    {
      "fieldDefinitionName": "Activated By Crisis",
      "fieldDefinitionGuid": "38a33db5-6fdd-4bd5-bd5e-5d0a8576a8d5"
    },
    {
      "fieldDefinitionName": "Activated By Test",
      "fieldDefinitionGuid": "74b34645-7e15-4dd6-b2f2-22f43fa8ffe8"
    }
  ],
Root Section
This section defines the layout of the content in the mobile app.
{
 "acl": [
 ],
 "updateTriggerField": {
 },
 "root": {
"title": {
    "fieldDefinitionName": "Plan Id",
    "fieldDefinitionGuid": "8a5f0682-dc03-4797-a648-18dd5e56fdf4"
  },
  "content": {
    "fieldDefinitionName": "Plan Title",
    "fieldDefinitionGuid": "55266b19-e895-4ec7-9f7c-a69e88269c0c"
  },
  "elements": [
    {
     "title": {
       "text": "Plan Activated"
     },
     "display": "false"
   },
    ....
  }
}
Figure 1.1: Report Template - updateTriggerField Example
In Figure 1.2.1 below, the title value pair of “Plan ID” and “Plan Title” are used to create the nodes at the root level, meaning all Plan IDs will be listed with their corresponding titles when the content menu item is selected.
Setting Display Values: Title and Content
Node/Element Titles can either be configured as custom text when using “title”: “Plan ID” or a paired combination of “fieldDefinitionName” and “fieldDefinitionGuid”. When using the “fieldDefinitionName” and “fieldDefinitionGuid” pairs, the corresponding Archer Field values will be displayed. For example, mapping to the Plan ID field within a plan using the correct GUID will display ‘Plan-248789’ vs ‘Plan ID’.
This example set the title value to “Plan Title”.
{
  "title": {
      "title": "Plan Title",
    },
    "content": {
      "fieldDefinitionName": "Plan Title",
      "fieldDefinitionGuid": "GUIDForArcherField"
    }
}
or
This example will map to the field value in Archer and set the title accordingly.
{
  "title": {
      "fieldDefinitionName": "Plan Id",
      "fieldDefinitionGuid": "GUIDForArcherField"
    },
    "content": {
      "fieldDefinitionName": "Plan Title",
      "fieldDefinitionGuid": "GUIDForArcherField"
    }
}
Figure 1.2.1: ReportTemplate.json title examples
Creating Nested Elements
The first “elements” object contains all of the elements that will be displayed when a plan is selected. In the example below, the first element that is listed will be hidden from the display (see “display”: false in the provided example), this can also be accomplished by omitting the element from the JSON file entirely.
 {
  "elements": [
      {
        "title": {
          "text": "Plan Activated"
        },
        "content": {
          "fieldDefinitionName": "Plan Activated Status",
          "fieldDefinitionGuid": "GUIDForArcherField"
        },
        "display": "false"
      }
  ]
}
Figure 1.2.2: ReportTemplate.json element examples
Creating Child Nodes within an Element
With this JSON file, the “General Plan Information” element will be displayed first after a plan is selected. Within this element, a “childContentNode” object can be defined to further define the content hierarchy. The “elements” object can also be defined within the “childContentNode” object to add another navigation level to the content hierarchy. These elements will be displayed within a new page upon selection of “General Plan Information”. In this example, the navigation would be as follows:
Plan-248789 > General Plan Information > Plan Name
{
  "content": {
    "text": "General Plan Information"
  },
  "childContentNode": {
    "title": {
      "text": "General Plan Information"
    },
    "elements": [
      {
        "title": {
          "text": "Plan Name"
      },
      "content": {
        "fieldDefinitionName": "PlanName",
        "fieldDefinitionGuid": "GUIDForArcherField"
      }
    ]
  }
}
Figure 1.2.3: ReportTemplate.json childNodeContent example
*note: only nodes/elements that are defined will be displayed in the mobile app. Nodes/elements that are omitted from the file or marked as “display: false” will NOT be displayed in the Konexus mobile app.
Creating Incidents and Task Lists in Konexus
Creating Incidents and Task Lists
First, there is a new report created “Archer - Konexus Integration Crisis Events Source Report” for Crisis Event integration, which acts as a source to create Incidents and task lists within the Konexus application. This report will need to be added as a new node in the <connectorSettings> section of the App.config in the Connector. This new node is labeled <crisisReports>. When implemented and configured, this report–along with the template listed below–allows for Archer and Konexus to remain in-sync as progress/changes are made in either system.
<crisisReports>
<crisisReports>
    <report
     name=""
     id=""
     maxRecords=""
     interval="" />
</crisisReports>
|
Property |
Description |
Required |
Values/Examples |
|
name |
A friendly name for the plan report. This name will appear in the log file. |
Yes |
Crisis Event Report |
|
id |
The Id of the report in Archer. |
Yes |
1b35998f-963a-4f3c-a695-5779143344a6 |
|
maxRecords |
Limits the total number of plans to be synchronized to the mobile app. A smaller number is helpful while designing your mobile layout because sync will run faster. |
Yes |
100 |
|
interval |
The delay time between synchronization iterations. This is expressed in HH:MM:SS format. |
Yes |
00:01:00 |
|
templateFileName |
The filename of the template to use for this report. If omitted, the connector will look for a JSON file with a name that matches the id field. |
No |
CrisisEventTemplate.json |
Second, a Crisis Event Template will need to be created and added to your Connector configuration. This informs the Connector which fields to look for while creating the Incidents or task lists. This file is comprised of 4 sections and will be explained in detail below.
Incidents (from Archer to Konexus)
The incidents section of the template defines the fields and values the Connector will use to create Incidents in the Konexus system. In this template the Incident’s name, associations, and priority can be set. Once created in Archer and passed through the Connector, incidents can then be selected from ‘Existing Incidents’ when creating an alert or poll in Konexus.
Archer Interface Example

Template Section Example
Recommended Values
{
  "incident": {
    "priority": {
      "text": "Emergency"
    },
    "name": {
      "fieldDefinitionName": "Crisis Summary",
      "fieldDefinitionGuid": "6d015f7f-5d25-4f34-883f-ce1dd2a690aa"
    },
    "associations": [
      {
        "fieldDefinitionName": "Crisis Event Team Leader",
        "fieldDefinitionGuid": "1c8d8667-d471-4f1a-8a92-4ab95169e041"
      },
      {
       "fieldDefinitionName": "Crisis Event Additional Team Members",
       "fieldDefinitionGuid": "d580f67b-f797-4fbd-a3f2-b9a7a1a0562d"
      }
     ]
}
Priority
The priority value defines the criticality of an event, either Emergency or Operational. Currently, the only value that is accepted by the Connector is ‘Emergency’.
"priority": {
    "text": "Emergency"
}
Name
This value defines which field the Incident Name is derived from. The default is “Crisis Summary”. This is the display value that will be shown in the Konexus app when a user selects an existing incident during alert or poll creation.
Recommended Value
"name": {
      "fieldDefinitionName": "Crisis Summary",
      "fieldDefinitionGuid": "6d015f7f-5d25-4f34-883f-ce1dd2a690aa"
    },
Associations
This value defines the access control list for the Incident in the Konexus system. This value can be mapped to any field(s) that contains users. Any users within these fields will be able to access the incident in Konexus.
Recommended Value
   "associations": [
      {
        "fieldDefinitionName": "Crisis Event Team Leader",
        "fieldDefinitionGuid": "1c8d8667-d471-4f1a-8a92-4ab95169e041"
      },
      {
        "fieldDefinitionName": "Crisis Event Additional Team Members",
        "fieldDefinitionGuid": "d580f67b-f797-4fbd-a3f2-b9a7a1a0562d"
      },
Task Lists (from Archer to Konexus)
This section of the template defines the fields and values the Connector will use to create Task Lists in the Konexus system. This section of the template will define the Tasklist’s title, description, owners, assignees, and priority.
Archer Interface Example

Template Section Example
Recommended Values
"tasklist": {
    "title": {
      "fieldDefinitionName": "Task ID Reference",
      "fieldDefinitionGuid": "8b7f1eff-5c7f-4664-9985-abcd368c43f8"
    },
    "description": {
      "fieldDefinitionName": "Recovery Task Overview",
      "fieldDefinitionGuid": "cd05a659-0aec-4e86-baae-8c65435e0c8a"
    },
    "ownerIds": {
      "fieldDefinitionName": "Watched By",
      "fieldDefinitionGuid": "4d389434-25e3-409b-abf3-e09915e0e795",
    },
    "assigneeIds": {
      "fieldDefinitionName": "Performed By",
      "fieldDefinitionGuid": "4b5c4aec-25a8-4eb5-be41-61ae45e79f8d"
    },
    "priority": {
      "text": "Emergency"
    },
    "tasks": {
      "fieldDefinitionName": "Recovery Task Script",
      "fieldDefinitionGuid": "03792557-6b54-4727-abfd-4d58104c4b56"
    }
  }
Title
This value defines which field is used to create the Tasklist title in the Konexus system.
Recommended Value
"title": {
  "fieldDefinitionName": "Task ID Reference",
  "fieldDefinitionGuid": "8b7f1eff-5c7f-4664-9985-abcd368c43f8"
},
Description
This value informs the Connector which field to use to populate the description section of the Tasklist in the Konexus system.
Recommended Value
"description": {
  "fieldDefinitionName": "Recovery Task Overview",
  "fieldDefinitionGuid": "cd05a659-0aec-4e86-baae-8c65435e0c8a"
},
Owner Ids
This value(s) defines who will have access to monitor the Tasklist in Konexus.
Recommended Values
"ownerIds": {
  "fieldDefinitionName": "Watched By",
  "fieldDefinitionGuid": "4d389434-25e3-409b-abf3-e09915e0e795",
}
Assignee Ids
This value(s) defines who the tasklist will be assigned to in the Konexus system.
Recommended Value
"assigneeIds": {
  "fieldDefinitionName": "Performed By",
  "fieldDefinitionGuid": "4b5c4aec-25a8-4eb5-be41-61ae45e79f8d"
},
Priority
This value defines the criticality of the task list. Currently only ‘Emergency’ task lists are supported, meaning any recovery task that is passed through the Connector will be flagged as Emergency in the Konexus system.
Required Value
"priority": {
  "text": "Emergency"
},
Tasks
This value defines where tasks will be generated from. The recommended value is mapping to the Recovery Task Script field in Archer. Currently, the Connector will convert any bulleted or numbered lists to individual tasks within the tasklist that is created in Konexus. Please see the examples below on how to properly format your tasks in Archer for an optimized experience in Konexus.
Template Example
Recommended Value
"tasks": {
  "fieldDefinitionName": "Recovery Task Script",
  "fieldDefinitionGuid": "03792557-6b54-4727-abfd-4d58104c4b56"
}
Formatting Examples
Listed below are several scenarios of how data will transfer from Archer to Konexus as the Connector converts Recovery Task Scripts into individual Tasks. When creating Recovery Tasks, the most optimal format is a single formatted list (either numbered or bulleted). Proper formatting and removal of unnecessary text will ensure an optimized experience.
Recovery Task Formatting Suggestions:
- Limit text to formatted list only
- Create new Recovery Tasks for each unique set of Tasks
- Avoid using section or title headers in the Recovery Task Script field
Proper Formatting: A single formatted list within the Recovery Task Script

When properly formatted, as shown above, the correct tasks will be added to a tasklist in the proper order. The properly formatted Recovery Task Script can include either bulleted or numbered lists
Improper: Title or section header in the Recovery Task Script

In this example, the bolded task title will be ignored and the subsequent numbered list will be converted into tasks in the Konexus system.
Improper: Multiple titles or sections headers in the Recovery Task Script

In this example, the bolded section headers will be ignored and the numbered lists will be converted into a single Tasklist that includes all 8 items in the Recovery Task Script.
Improper: No bulleted or numbered lists in the Recovery Task Script

In this example, only a single task, title “Task 1 Task 2 Task 3 Task 4,” will be created in the tasklist.
Recovery Tasks (from Konexus to Archer)
The recoveryTasks section allows the Connector pass tasklist data from Konexus back into Archer. This section of the template will define how data relating to Tasklist status and activity is represented in Archer
Archer Interface Example
See example from the section above
Template Section Example
Recommended Values
"recoveryTask": {
  "taskActivitiesSubFormField": {
    "fieldDefinitionName": "Recovery_Sub_Tasks_and_Comments",
    "fieldDefinitionGuid": "9BB00AB9-A3F5-42D2-8402-16A3C667BCA5"
  },
  "status": {
    "fieldDefinitionName": "Task_Status",
    "fieldDefinitionGuid": "2b304447-4e62-4efe-8605-ecae27117129"
  },
  "statusNotStarted": {
    "fieldDefinitionName": "Status_NotStarted",
    "fieldDefinitionGuid": "f7ddfa0d-2110-42aa-bebf-68a8d5f83407"
  },
  "statusInProgress": {
    "fieldDefinitionName": "Status_InProgress",
    "fieldDefinitionGuid": "7983b32f-d759-4d16-b098-174f45f580a5"
  },
  "statusCompleted": {
    "fieldDefinitionName": "Status_Completed",
    "fieldDefinitionGuid": "643be728-a668-4a64-a449-153935cef362"
  },
  "durationInMinutes": {
    "fieldDefinitionName": "Actual_Duration",
    "fieldDefinitionGuid": "e5d0ea7b-f571-4b4b-8e2b-092ee41e0488"
  },
  "completedOn": {
    "fieldDefinitionName": "DateTime_Completed",
    "fieldDefinitionGuid": "c62cea77-2f02-4693-a12e-40f708507de0"
  }
}
Task Activities Subform Field
This value defines where task activities will be located in Archer when data is received from Konexus:
Recommended Value
"taskActivitiesSubFormField": {
  "fieldDefinitionName": "Recovery_Sub_Tasks_and_Comments",
  "fieldDefinitionGuid": "9BB00AB9-A3F5-42D2-8402-16A3C667BCA5"
}
Status, Status Not Started, Status In Progress, Status Completed
This value also defines where the status of each Recovery Task or Task List is located in Archer when data is received from Konexus.
The status value should be mapped to the drop down menu for Task Status while the other status related values should map to the options that are available.
Template Status Example
Recommended Value
"status": {
  "fieldDefinitionName": "Task_Status",
  "fieldDefinitionGuid": "2b304447-4e62-4efe-8605-ecae27117129"
},
"statusNotStarted": {
  "fieldDefinitionName": "Status_NotStarted",
  "fieldDefinitionGuid": "f7ddfa0d-2110-42aa-bebf-68a8d5f83407"
},
"statusInProgress": {
  "fieldDefinitionName": "Status_InProgress",
  "fieldDefinitionGuid": "7983b32f-d759-4d16-b098-174f45f580a5"
},
"statusCompleted": {
  "fieldDefinitionName": "Status_Completed",
  "fieldDefinitionGuid": "643be728-a668-4a64-a449-153935cef362"
},
Archer Interface Reference

Duration In Minutes
This value defines where the total duration of time taken to complete a Recovery Task or Tasklist is located in Archer when data is retrieved from Konexus. This value is expressed in the number of minutes from when the Recovery Task is marked as in progress to when it is marked as completed.
Recommended Value
"taskActivitiesSubFormField": {
  "fieldDefinitionName": "Actual_Duration",
  "fieldDefinitionGuid": "e5d0ea7b-f571-4b4b-8e2b-092ee41e0488"
}
Completed On
This value defines where the completion of a Recovery Task or Tasklist is located in Archer when data is retrieved from Konexus.
Recommended Value
"taskActivitiesSubFormField": {
  "fieldDefinitionName": "Actual_Duration",
  "fieldDefinitionGuid": "e5d0ea7b-f571-4b4b-8e2b-092ee41e0488"
}
Recovery Task Subform (from Konexus to Archer)
This section of the template informs the Connector where to place data relating to individual tasks within a Recovery Task or Tasklist. In this section the subform ID, level ID, comment, activity ID, assignee external ID, task description, and the various status values will need to be correctly mapped to allow data to be passed from Konexus back into Archer.
Archer Interface Reference

Template Section Example
Recommended Values
"recoveryTaskSubForm": {
    "subFormId": {
      "fieldDefinitionName": "Recovery_Sub_Tasks_and_Comments",
      "fieldDefinitionGuid": "dd907010-4477-4abd-a471-ec926418d638"
    },
    "levelId": {
      "fieldDefinitionName": "LevelId",
      "fieldDefinitionGuid": "b7b0a7d8-d51e-4ce7-b2ef-3d570d10c9a9"
    },
    "comment": {
      "fieldDefinitionName": "Comment",
      "fieldDefinitionGuid": "b2e2609f-b0fc-4a83-ab51-4d39cb894e2d"
    },
    "activityId": {
      "fieldDefinitionName": "Konexus_Activity_ID",
      "fieldDefinitionGuid": "b2552a38-c45b-4b5e-b4e3-0a0e8c268160"
    },
    "assigneeExternalId": {
      "fieldDefinitionName": "Performed_By",
      "fieldDefinitionGuid": "812ec4b0-51b3-449e-9aba-ed8f40fa4d97"
    },
    "taskDescription": {
      "fieldDefinitionName": "SubTask",
      "fieldDefinitionGuid": "e4296ad5-24ac-49d1-a3ca-4a1bce21ec61"
    },
    "status": {
      "fieldDefinitionName": "Status",
      "fieldDefinitionGuid": "d8169a32-9e84-4380-b088-627238e4e43a"
    },
    "statusCompleted": {
      "fieldDefinitionName": "Status_Completed",
      "fieldDefinitionGuid": "5f21d5d1-e03f-4ec1-8780-4be41a7ec113"
    },
    "statusSkipped": {
      "fieldDefinitionName": "Status_Skipped",
      "fieldDefinitionGuid": "5b0f8300-6e10-4830-8235-ed5a245b6bf1"
    },
    "timestamp": {
      "fieldDefinitionName": "DateTime_Completed",
      "fieldDefinitionGuid": "5a55f9b8-fb6f-4214-8c42-9def4e79bb10"
    }
}
Subform ID
This value defines which Archer subform will receive task list activities from Konexus.
Recommended Value
Level ID
This value defines which Archer subform will receive task list activities from Konexus
Recommended Value
"levelId": {
  "fieldDefinitionName": "LevelId",
  "fieldDefinitionGuid": "b7b0a7d8-d51e-4ce7-b2ef-3d570d10c9a9"
}
Comment
This value defines where the comments of each task are located in Archer when data is retrieved from Konexus.
Recommended Value
"comment": {
  "fieldDefinitionName": "Comment",
  "fieldDefinitionGuid": "b2e2609f-b0fc-4a83-ab51-4d39cb894e2d"
}
Activity ID
This value defines the field that will hold the unique ID of the activity and used to correlate the activities that have been created in Archer.
Recommended Value
"activityId": {
  "fieldDefinitionName": "Konexus_Activity_ID",
  "fieldDefinitionGuid": "b2552a38-c45b-4b5e-b4e3-0a0e8c268160"
}
Assignee External ID
This value defines where the information on the individuals assigned to a task are located in Archer when data is received from Konexus
Recommended Value
"assigneeExternalId": {
  "fieldDefinitionName": "Performed_By",
  "fieldDefinitionGuid": "812ec4b0-51b3-449e-9aba-ed8f40fa4d97"
}
Task Description
This value defines where the description of the individual task is located in Archer when data is retrieved from Konexus.
Recommended Value
"taskDescription": {
  "fieldDefinitionName": "SubTask",
  "fieldDefinitionGuid": "e4296ad5-24ac-49d1-a3ca-4a1bce21ec61"
}
Status, Status Completed, Status Skipped
This value defines where the status of each task is located in Archer when data is received from Konexus.
The status value should be mapped to the drop down menu for Task Status while the other status related values should map to the options that are available.
Template Status Example
Recommended Value
"status": {
  "fieldDefinitionName": "Status",
  "fieldDefinitionGuid": "d8169a32-9e84-4380-b088-627238e4e43a"
},
"statusCompleted": {
  "fieldDefinitionName": "Status_Completed",
  "fieldDefinitionGuid": "5f21d5d1-e03f-4ec1-8780-4be41a7ec113"
},
"statusSkipped": {
  "fieldDefinitionName": "Status_Skipped",
  "fieldDefinitionGuid": "5b0f8300-6e10-4830-8235-ed5a245b6bf1"
}
Timestamp
This value defines where the information on the individuals assigned to a task are located in Archer when data is received from Konexus.
"timestamp": {
  "fieldDefinitionName": "DateTime_Completed",
  "fieldDefinitionGuid": "5a55f9b8-fb6f-4214-8c42-9def4e79bb10"
}
Troubleshooting
How To Capture Verbose Logs
Verbose logging logs all traffic in and out of the connector, so it will cause the log to grow very quickly. As a result verbose logging should only be enabled long enough to capture the error in question
- Stop the connector service.
- Backup the .config.
- Open the connector's .config file and change the "serilog:minimum-level" to "Verbose"
<add key="serilog:minimum-level" value="Verbose" />. - Disable the report pipelines to minimize log size by commenting out the reports sections in the logs that are not impacted by the error. The report sections include <planReport>, <crisisReport>, <reports>.
- Stage the plan or recover task in Archer that is in question by modifying the trigger field.
- Start the connector service.
- Observe the logs until an "ERR" level message is logged.
- Stop the connector service.
- Restore the .config from the backup in step 2.
- Start the connector service.