
How to Use the Contact Management Interface
From the Manage Contacts page, you have the ability to add, edit, or remove contacts from the currently selected directory. The classification of each contact will determine whether they are categorized as internal or public.
Additionally, this page offers a variety of tools and links for your convenience. By utilizing the buttons located at the top right corner, you can:
- Add a Contact
- Upload Contacts from a file
- Download your Contacts in a spreadsheet.
- Navigate to the Group Management page.
Create and Manage Contacts
1. To update an existing contact, simply select the contact from the list, or if you wish to add a new contact, click the 'Add Member' button located at the top of the page.

2. Complete or Update the Contact Details form
Basic Information
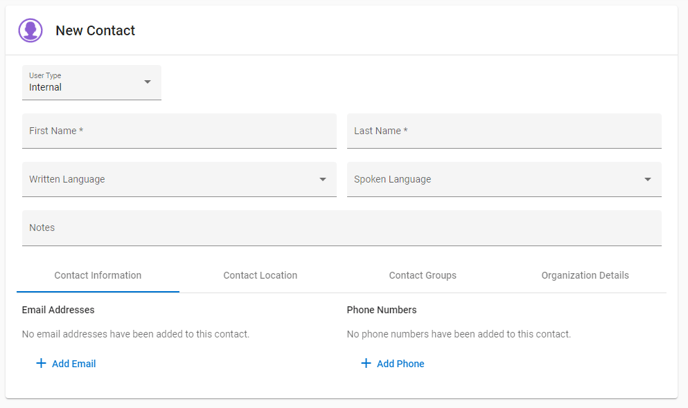
Basic Information Fields Overview
- Classification - Required
The User Type field determines the directory to which contacts are linked. Modifying this value will also alter the directory association of the contact. It is advisable to keep this field as is. Instead, please ensure you are in the correct directory when adding new contacts.
- First Name - Required
- Last Name - Required
- Emails - At Least 1 is Recommended - comma separate for multiple
- Address - Recommended
- City - Recommended
- State/Province - Recommended
- Zip/Postal Code - Recommended
- Location - Required for Geo-Targeted Alerting
- Contacts that lack a specified location will not be eligible for geo-targeted alerting. Additionally, if a contact does not have an email address, it is essential to have at least one phone number recorded in their profile to ensure effective communication.

Basic Information Fields Overview
- Profile Photo Upload - Optional
- Agency Business - Optional
- This field can be used to help organize your internal contacts by their department/job function. It can be used on the Manage Contacts page for sorting and filtering.
- Job Title - Optional
- Credentials
- This is a read only field that is populated if an internal contact is invited by one of your administrators to create an account to access our applications.
- Web Page - Optional
- Notes - Optional
- Status - Optional
- Written/Spoken Language - Optional
- These fields will allow the contact to receive auto translated messages in the selected language.
Contact Devices

Contact Devices Fields Overview
- While all of the above fields are optional, it is important to note that at least one form of contact information is required for the successful creation of a contact.
- Email(s)
- Mobile Phone and/or Pager Phone
- Home Phone and/or Business Phone
Alternate Phone and 2nd Mobile Phone are for display only when viewing a contact's profile. Alerts will not be sent to these numbers.
Organize

This section of the form allows you to search for and place the contact into a group if you would like to.
Accessing a Contact's Public Subscriber Record
For public contacts who have opted to receive alerts through your organization's public signup page, these individuals will be automatically integrated into your public directory contacts. To access their subscriber record, simply click on the last tab of their profile. This section will provide you with detailed information about their Weather Preferences, as well as their location, contact details, group affiliations, and the Alert History they have received.

Upload or Export Contact Information
Warning: If contacts and admins are managed through one of our automated or FTP upload processes, the Member List Upload feature should not be utilized.
- You can export Group and Internal Member lists by selecting Member List Download.
- You have the option to upload your own contact lists by utilizing the Member List Upload link. On the Member List Upload screen, you will find comprehensive details and a sample file to guide you in effectively managing your lists through this feature.

- When utilizing the Member List Upload feature, please note that each file can contain a maximum of 1500 rows. Should your file exceed this limit, you will need to divide it into multiple smaller files for successful processing.